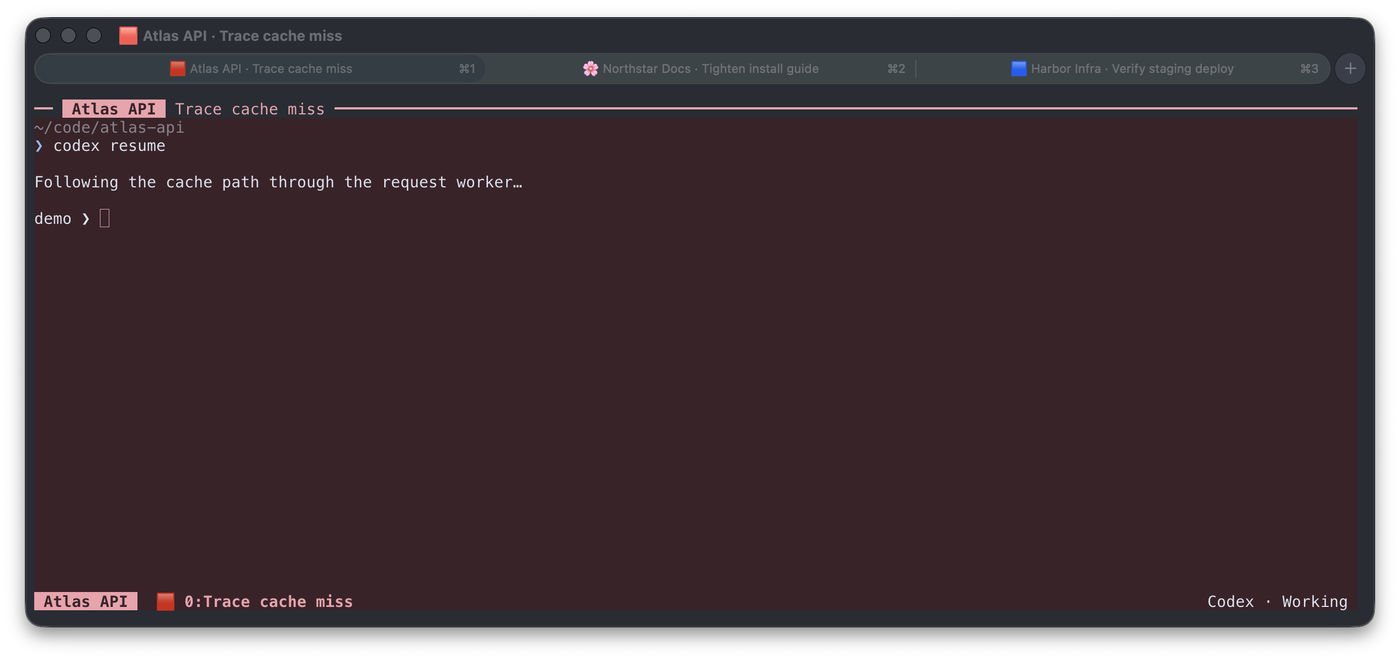
A new Ghostty tab gets its own color. It keeps that color while you work. If you use tmux, you can also show the project, task and state in small bands. Everything stays on your computer.
Set it up on a Mac
You need Ghostty, Git and Python 3.8 or newer. You only need tmux if you want the top and bottom bands shown above.
-
Check the tools on your Mac
Open Ghostty. Paste these two lines and press Return:
git --version
python3 --version
You should see a version number after each line. Python must be version 3.8 or newer. If Git is missing, use the install message from your Mac or visit the Git download page. If Python is missing, use the Python download page.
-
Download Context Tabs
Paste this command into Ghostty:
mkdir -p ~/.local/share
git clone https://github.com/vipr8/ghostty-context-tabs \
  ~/.local/share/ghostty-context-tabs
This puts a local copy in your home folder. You only do this once.
-
Tell your shell to load it
Most Macs use a shell named zsh. Its settings are in a file named
.zshrc. Run these commands to make the file if needed and open it in TextEdit:touch ~/.zshrc open -e ~/.zshrcGo to the bottom of the file. Paste these two lines:
export PATH="$HOME/.local/share/ghostty-context-tabs/bin:$PATH"
source "$HOME/.local/share/ghostty-context-tabs/shell/context-tabs.sh"
Press Command + S to save. Close TextEdit. Return to Ghostty and run:
source ~/.zshrc
context-tabs --version
You should see
0.1.0. That means the command is ready. -
Check the colors
Press Command + T to open a new Ghostty tab. Open one more tab the same way. Each tab should keep its own background color.
You can check the current tab with:
context-tabs showIf you only want different colors, you are done.
Add the project and task bands
The bands in the recording come from tmux. You can skip this part if you do not use it.
-
Check for tmux
Run this in Ghostty:
tmux -VIf you see a version number, move on. If you see
command not foundand use Homebrew, runbrew install tmux. -
Tell tmux to show the bands
tmux keeps its settings in a file named
.tmux.conf. Open it in TextEdit:touch ~/.tmux.conf open -e ~/.tmux.confGo to the bottom. Paste this one line:
source-file ~/.local/share/ghostty-context-tabs/tmux/context-tabs.confSave the file and close TextEdit. Then start tmux:
tmuxIf tmux was already open, run
tmux source-file ~/.tmux.confto reload the file. -
Name the work in this tab
Try this inside tmux:
context-tabs set --project "My Project" --task "Write the guide" \
  --state working --tool Codex
The project and task should appear at the top. The tool and state should appear at the bottom. The Ghostty tab also gets a short title.
Use it each day
When you are inside a Git repo, Context Tabs can find its name. You only need to give the task a short name:
ctask "Fix the login page"
cstate waiting
A repo is the folder for one project. Context Tabs does not read your prompts, chats or model output. It only uses the name you type.
Optional: make text easier to read
This is a safety setting for text contrast. Context Tabs works without it.
While Ghostty is active, press Command + ,. Ghostty will open its config file. A blank file is fine. Add this line:
minimum-contrast = 4.5Save the file. Return to Ghostty and press Command + Shift + , to reload it.
If something does not work
Ghostty says “context-tabs: command not found”
Run source ~/.zshrc again. If that does not help, reopen .zshrc and check that both setup lines are at the bottom.
The colors work, but I cannot see the bands
Make sure you are inside tmux. Then run tmux source-file ~/.tmux.conf.
I use Bash or Linux
On a Mac with Bash, put the two setup lines in ~/.bash_profile. On Linux, use ~/.bashrc or ~/.zshrc for your shell.
Remove it
First run context-tabs reset to bring back your normal Ghostty colors. Then remove the two Context Tabs lines from .zshrc. If you set up tmux, remove its source-file line from .tmux.conf. Last, run:
rm -r ~/.local/share/ghostty-context-tabs
rm -r ~/.local/state/ghostty-context-tabs
These commands delete only Context Tabs and its small local state file.
Small on purpose
Context Tabs joins features that Ghostty and tmux already have. The installed tool does not add an account, a background service or tracking. Project and task names stay on your computer, but they can be seen in screenshots or screen sharing. Use short names that are safe to show.
This guide uses Cloudflare Web Analytics to count visits and understand page performance. It does not use cookies or browser storage. The installed Context Tabs tool remains telemetry-free; the privacy notes explain the distinction.
The source, full privacy notes and test suite live in the GitHub repository.